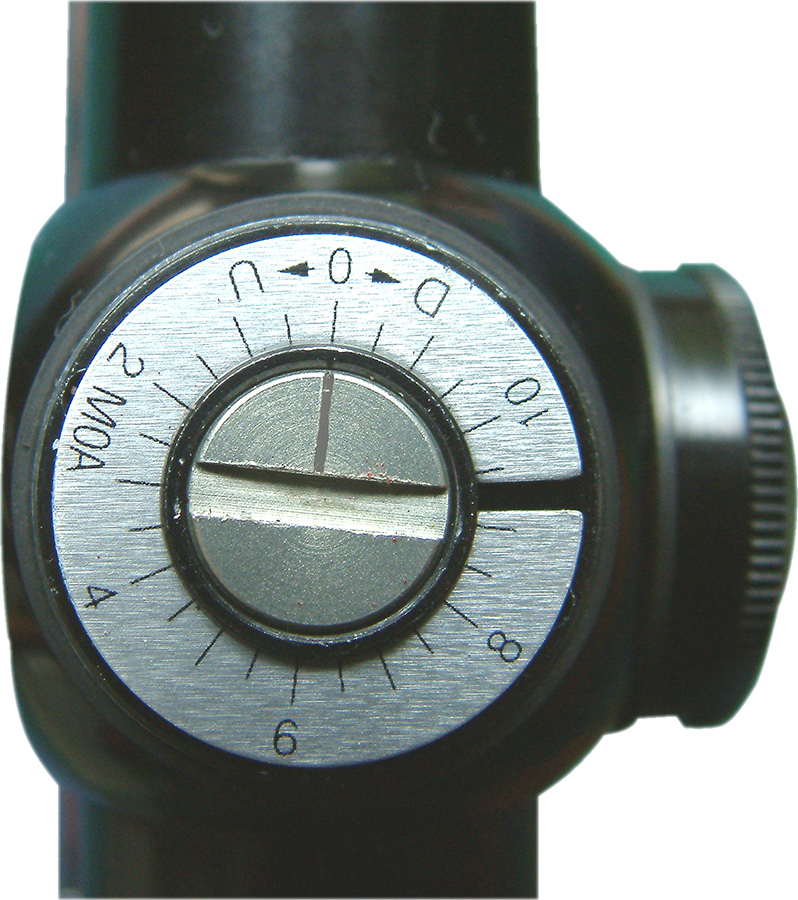
elevation adjuster for telescopic sight
Introduction
The purpose of zeroing is to ensure that the bullet follows the expected trajectory with respect to the line of sight (LOS). Zeroing takes into account the telescope and ballistics of the ammunition used in a particular rifle. This guide is linked to others in the firearms series. Note: This guide uses imperial measures. To convert to metric, measurements given in yards are approximate only and can be replaced by the same figure in metres. Measures in inches can be replaced by centimetres at the rate of 1 inch = 2.5 centimetres
Basic principles
- Before zeroing check that the rifle, mounts and scope are compatible. All screws on the rifle stock/action and telescopic sight and mounts must be tight and the barrel clean and dry inside.
- Use the same ammunition that will be used when stalking.
- Do not zero in extreme weather conditions, a dry day with low winds is ideal.
- Use a target that will allow you to take a consistent and accurate aiming point.
- Do not allow anything to come in contact with the rifle barrel or moderator, including fingers wrapped around or touching the barrel.
- Adopt a comfortable firing position, and use a rest − either prone, or a purpose made bench rest. (See Firing positions guide).
- Allow sufficient time between shots to prevent the barrel from overheating.
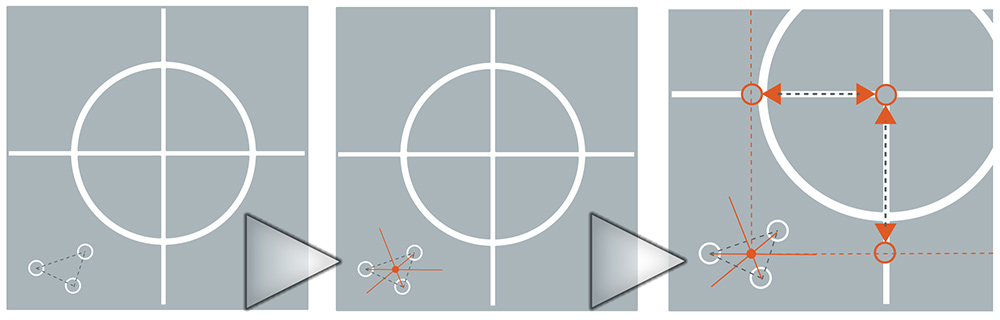
(left) To calculate the MPI, draw lines between the centres of each bullet hole on the target; (centre) Next, draw a line from the centre of each bullet hole across the midpoint of the opposite line. Where these second lines cross one another is the MPI; (right) Using the MPI, calculate elevation (up or down) and windage (left or right)
Bore sighting
Bore sighting is carried out when the scope is first attached to the rifle and is a means of checking that the rifle and scope are roughly in alignment before making fine adjustments at a chosen zero distance. There are a number of aids such as laser bore sighters that can be used by following the manufacturer’s instructions. Alternatively use the method below.
- Set a target up at a range of 25 yards. The target should have a safe foreground (no possibility of people or animals straying onto the range without being seen) and a safe background (capable of capturing multiple shots in the same area without any danger of bullets or fragments escaping).
- Remove the bolt and secure the rifle on a firm bench or sandbags where it can be aligned with a suitable aiming point by looking down the barrel.
- Adjust the telescopic sight so that the reticule centre and the barrel both point at the target centre. The barrel can be aligned by making sure that the concentric circles seen when looking down the bore are exactly centered on the target.
- Fire a three-shot group, calculate the mean point of impact (MPI) and adjust the reticule as shown in fig.1. Another way of making the shots coincide with the reticule centre is: Starting with the reticule centred on the target and the rifle held absolutely still, adjust the scope until the reticule centre points at the MPI .
- Each interval (“click”) on the adjustment turrets of a telescopic sight will move the point of bullet impact a specific distance at a particular range (check maker’s instructions).
- Remember that at 25 yards, an adjustment will require four times as many clicks than at 100 yards, eg if the adjustment is four clicks for an inch at 100 yards, it will be sixteen clicks for an inch of movement at 25 yards.
- Alternatively, at 200 yard only 2 clicks will be required.
- Fire an additional three shots to confirm adjustments.
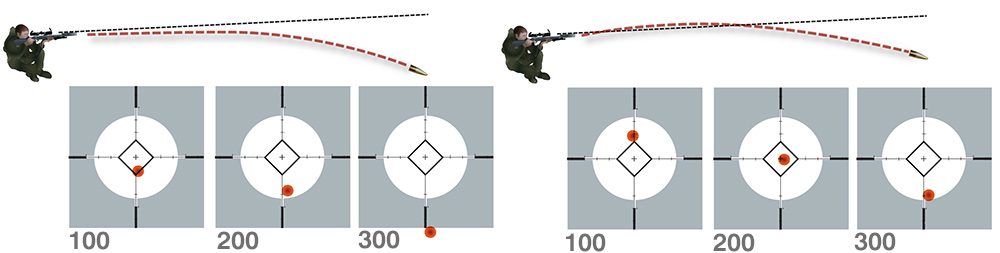
line of sight represented by straight (black) dotted line, while bullet path represented by the curved red line
(above left) If the scope is mounted parallel to the bore, the path of a bullet will fall away from the line of sight due to the effect of gravity. The point of impact will, therefore, always be below the line of sight. (above right) In order to account for this, the purpose of zeroing is to adjust the telescope so the barrel of the rifle is elevated in relation to it. The bullet path will then rise and fall through the line of sight, crossing first at around 25 yards. The point at which the bullet falls back through the line of sight is the zero distance, in this case 150 yards.
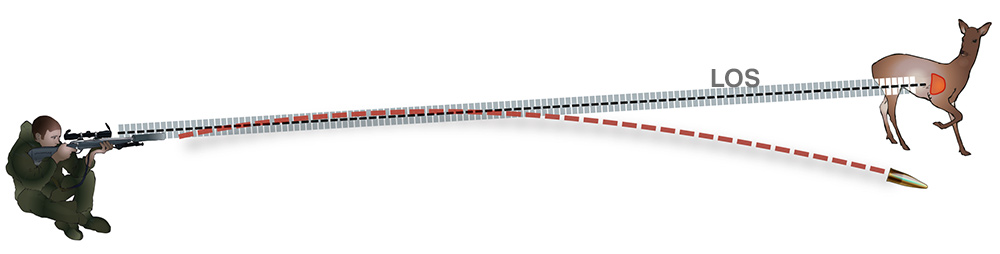
LOS or ‘line of sight’ is the black line within the blue shaded area, which represents the vital zone
(above) bullet first crosses line of sight (LOS) at 25yds and for a second time further on so that, at its apex it is just within the vital zone. After this the bullet drops out of the vital zone
Choosing zero range
In order to ensure a humane shot the bullet needs to fall into the vital zone of the animal (see Shot Placement guide). Because it is difficult to judge distance accurately it makes sense to zero the rifle at the distance for which the bullet will remain within the chosen vital zone for the maximum possible distance, see fig 2c. For most rifle calibres this will mean a zero distance of between 100 and 200 yards. If in doubt the rifle should be zeroed such that the point of impact should fall within a 4” diameter killing area out to about 200yards, without the need to adjust the point of aim. As a rough rule of thumb, for many deer legal calibres this will mean zeroing approximately one and a half inches high at 100 yards, or, alternatively, a zero at 150 yards. Check manufactures’ ballistic tables or software to confirm the trajectory, ensure the drop figures given are relative to the line of sight.
Zero at chosen range
- Set up a target with a safe background/foreground at your chosen zero range. It may be useful to back the target with a larger piece of paper in case the initial shots miss the target sheet.
- Using the same sight setting that you finished with when bore sighting, fire a minimum of three shots, calculate the MPI and adjust the sights accordingly.
- Check the adjustment by firing a second group. Repeat adjustment and shooting as necessary, until the MPI is in the right place.
- Remember that if your telescope adjustment is four clicks for an inch at 100 yards it will be two clicks for approximately an inch of movement at 200 yards.
Testing either side of zero
- If you have the opportunity, take shots at greater and lesser ranges than the zero range to check the trajectory of the ammunition.
When to check zero
A correctly assembled rile/sight combination should hold its zero for a long period of time, however, consider checking zero:
- as frequently as is reasonable, wait for good conditions if possible
- when changing any aspect of the ammunition
- after loosening/tightening any scope mount or stock bedding screws
- if beginning or ceasing to use a sound moderator
- if the rifle/scope has received a hard knock
- if you suspect a loss of zero for any other reason
[printfriendly]