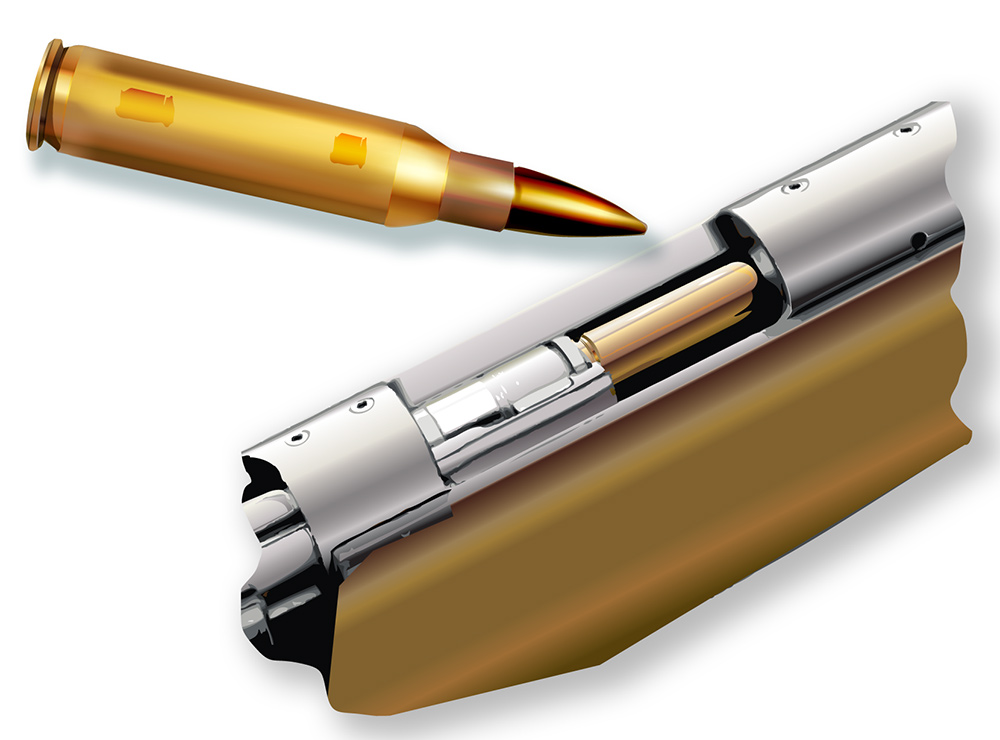
loading rifle bullet
Introduction
The aim of this guide is to describe the factors to be considered when choosing a rifle/ammunition combination and to highlight important aspects of rifle ballistics. This guide should be read with the Zeroing and Shot placement guides. It specifically covers:
The legal limitations on which rifles and ammunition can be used;
A description of why expanding ammunition is required to shoot deer;
Bullet trajectory, drop and the effects of wind.
Note: This guide uses imperial measures. To convert to metric, measurements given in yards are approximate only and can be replaced by the same figure in metres. Measures in inches can be replaced by centimetres at the rate of 1 inch = 2.5 centimetres.
Legal limitations
For the killing of deer in the Republic of Ireland firearms and ammunition must conform to minimum requirements laid down in the Wildlife Acts 1976 – 2000. These are stated as follows:
Rifles and Ammunition:
| Deer species | Min bullet weight | Calibre | Min muzzle energy |
|---|---|---|---|
| All species | 55 grains | .22/250 (Centrefire of .22 inches ) | 1700 foot pounds |
However while the above are the minimum calibres laid down in law both Deer Alliance and NARGC recommend a rifle calibre of greater than .240 inches and bullet weight of 100 grains
NB. Ensure that all three conditions are met for your chosen calibre of rifle
Rifle bullets must be either hollow nosed or soft nosed. Note: this is generally interpreted to include “ballistic tip” and other bullets designed to deform in a predictable manner.
Any firearm or other method of humane dispatch may be used to prevent suffering to injured or wounded deer.

an expanding bullet causes an outer ‘balloon’ area, representing the temporary cavity, whilst the central core represents the permanent cavity
Why use expanding ammunition?
The severity of a bullet wound is directly related to damage caused by the path of the bullet plus the amount of kinetic energy that is transferred from the bullet to the tissues of the body.
The path of the bullet through tissue can be categorised into the permanent and temporary wound cavity (see diagrams below).
Expanding ammunition increases the rate at which the energy transfer takes place and will create larger and more predictable permanent wound cavities than solid ammunition.
A temporary wound tract occurs where the expansion of the bullet causes a temporary elastic expansion of the tissue. The contribution of the shock to death is when the elastic limit of the tissue is overcome and permanent damage results.
(top) solid ammunition produces little transfer of energy with minimal heart damage; whilst expanding
ammunition (below), results in good
transfer of energy and ensures the heart is destroyed
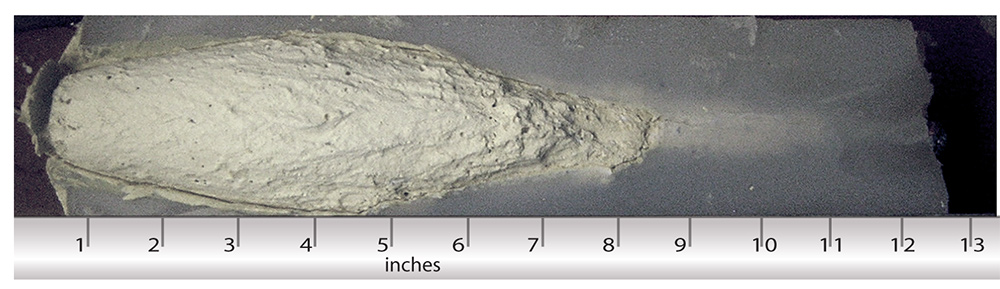
Plaster casts of permanent wound tract tracts. The same rifle/ammunition was used to produce both wound tract 1 (above) and 2 (below)
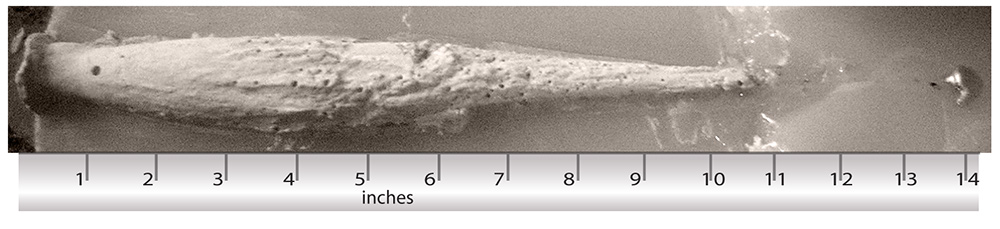
wound tract 2
Wound tract 2 was shot at 4 times the range of wound tract 1.
The bullet shot at longer range was therefore going much slower and resulted in slower expansion and a significantly smaller wound tract. Do not shoot at very long range.
Bullets are designed to expand within a particular energy band. The difference between wound tract 1 and wound tract 2 also illustrates the difference between bullet that had sufficient energy and has expanded, and one that has not.
Ballistic tables
Ballistic tables will ensure that you are aware of the approximate technical capabilities of your rifle ammunition combination. These tables can be generated either by using the information provided with the ammunition or through the use of commercially available, or manufacturer’s free, ballistic software.
Accuracy
A bullet has to strike the correct place in order to achieve a humane kill. The appropriate aim points are discussed in the Shot Placement guide. The ability to place a bullet consistently, over a range of distances and weather conditions, requires knowledge and understanding of the cumulative effect of three key factors:
- The effect of distance on group size;
- The effect of distance on bullet path;
- The effect of wind on bullet path.
The examples above are based on a notional 4” diameter vital zone (killing area) for a chest shot deer. The right bullet, falling within this vital zone, would kill a deer of any species found in Ireland.
The effect of distance on group size
Group size is the result of an individual’s ability to shoot, plus the consistency of the rifle/ammunition combination.
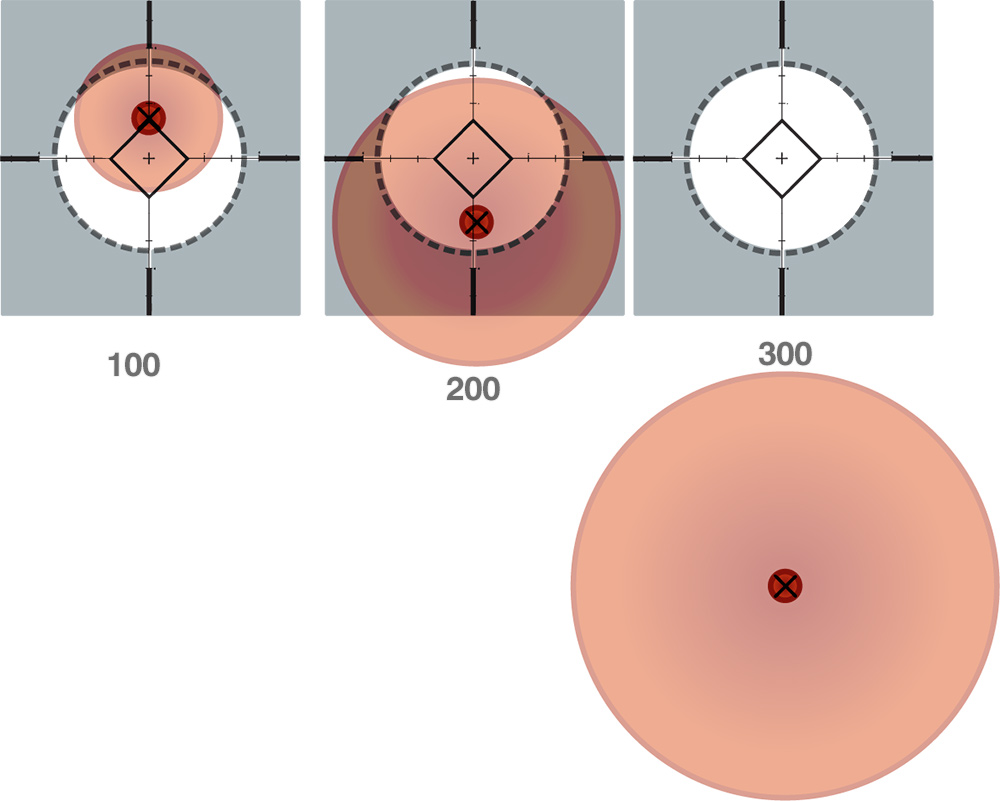
Group size will increase proportionately over distance e.g. if your grouping is 3” at 100 yards, it will increase to 6” at 200 yards and 9” at 300 yards (Fig. 1). The longer the range, the less the likelihood of the bullets consistently falling within the notional 4” vital zone.
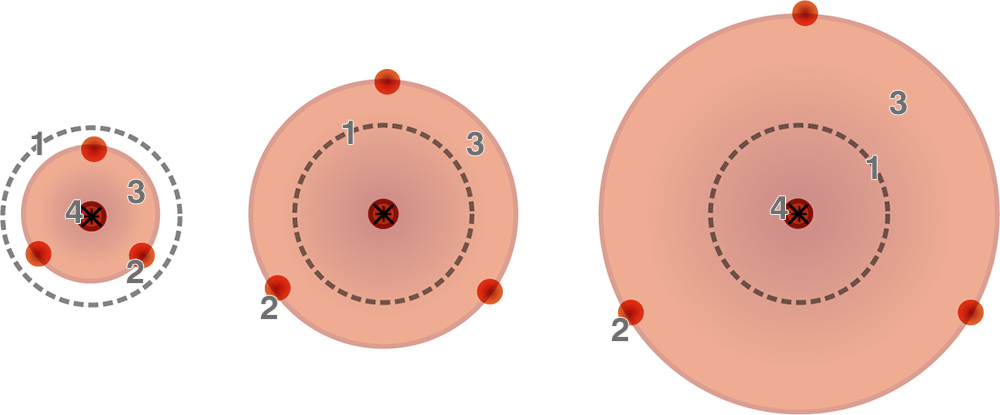
Effect of distance on group size. 1: (dotted line) vital zone; 2: (red dot) bullet; 3: (orange circle) group size; 4: point of aim. note how the group size (3) has increased from 4″ (on left) to 9″ at 300 yds (on right)
above shows how group size increases proportionally with distance. The illustration assumes an ability to produce a 3″ group at 100 yards. Note that the Mean Point of Impact (MPI) remains the same. The shaded area represents the possible area in which bullets could fall at each given distance. (left) at 100 yds a radius of 3″ from the MPI is easily contained within the 4″ killing area; (centre) at 200 yds the radius from the MPI increases to 6″ at 150yds; (right) at 300 yds, the radius from the MPI has increased to 9″. Added to the effect of bullet drop this has significant consequence
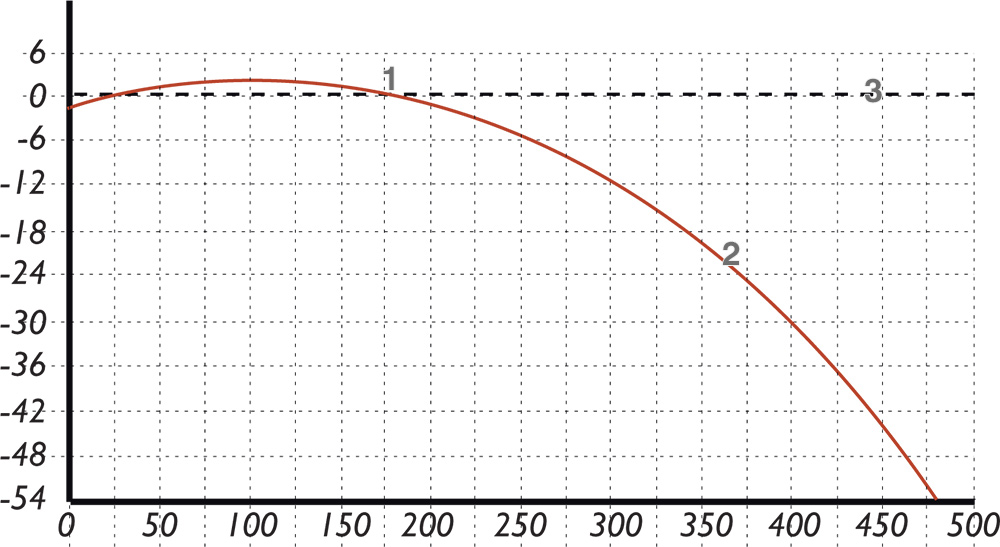
1: point of zero 2: bullet path example for a typical rifle/ammunition combination; 3: line of sight
(above) the vertical axis represents inches while the horizontal axis show range in yards
effect of distance on bullet path. (left) 100 yards (centre) 200 yards (right) 300 yards. above shows an example of a bullet path for a typical stalking rifle/ammunition combination. Note particularly how the bullet drop changes with respect to the line of sight and increases markedly beyond the zero distance.
The effect of distance on bullet path
While all bullet flights (trajectories) are curved, the exact path will depend mainly on the bullet weight, its speed and how efficiently it flies through the air. Bullet paths will therefore be different for different rifle/ ammunition combinations.
Unlike group size, which increases in direct proportion with distance, bullet drop does not. In relation to the line of sight, bullet drop can be largely ignored within the zero range, but increases rapidly beyond it, making distance judgement critical.
All rifles for shooting live targets should be zeroed in such a way that the bullet falls within the chosen vital zone over as long a distance as possible from the muzzle. As a rough rule-of-thumb zeroing most deer rifles so that shots fall within a 4 inch(10 cm) vital zone up to 200 yards(metres) without the need to adjust the point of aim, will help to eliminate errors in distance judgement (see the Zeroing guide).
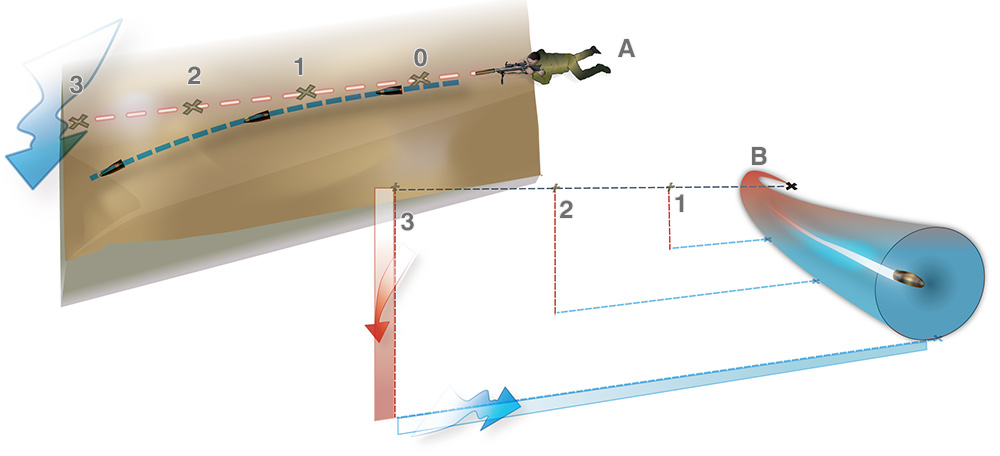
be aware of the effect of wind and that the effect varies over distance. 1, 2, 3 represent 100, 200, 300 yards respectively. In A note how the sight line is straight (0 being the firing point) whilst the bullet path is affected by wind (blue arrow). In B the x represents the firing point with the red arrow being bullet drop and the blue arrow representing wind deflection (the black dotted line being the sight line)
The effect of wind
The effect of wind on the flight path of a bullet is relatively difficult to predict. The extent to which wind will push a bullet off course (wind deflection) will depend on wind strength, wind direction relative to the bullet path, the speed and shape of the bullet and the distance that it travels. Winds at right angles to the bullet path will have the most effect, head or tails winds only a marginal effect. The effect of wind is also inconsistent over distance, strong winds near the muzzle will have proportionately greater effect than nearer the target.
- Ensure that you understand as far as possible the effect of wind on the flight of your rifle/ammunition combination, in order to take the decision whether to shoot.
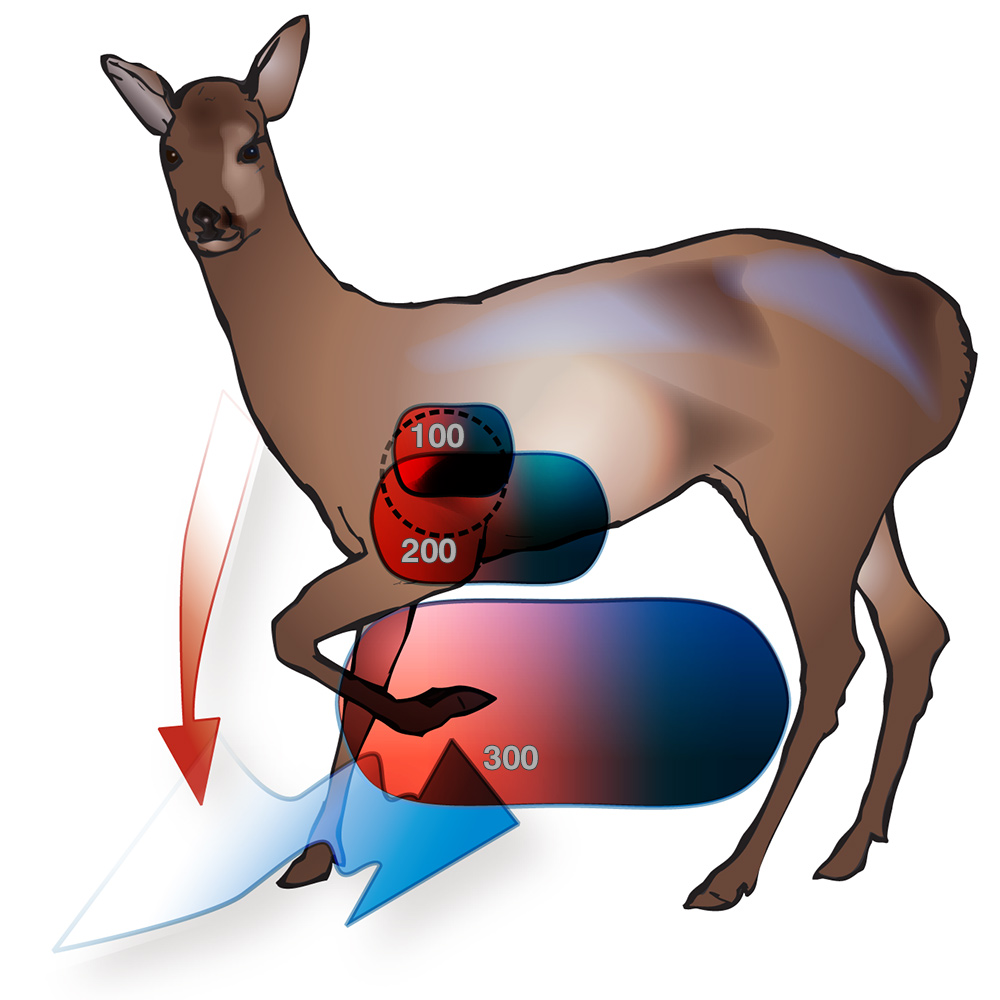
Putting it all together (above) the shaded areas represent the possible areas in which a bullet, aimed at the centre of the vital zone, could fall at different distances when the combined effects of group size and bullet path (red) and a moderate varying cross wind (blue) are taken into account
Putting it all together
- Deciding on exactly where to aim or whether a particular shot is advisable, depends on the personal ability of the shooter and an ability to assess the cumulative effect of the 3 variables above.
- Common sense dictates that the larger the likely group size, longer the range and stronger the wind, the less likely it is that a shot can be placed accurately.
- Ensure you recognise your own limitations when shooting live deer and keep within your capabilities. Preparing a ballistic table(including wind deflection) for your rifle/ammunition combination can be a useful guide to making decisions.
Further info
1 See the Legislation guide
[printfriendly]