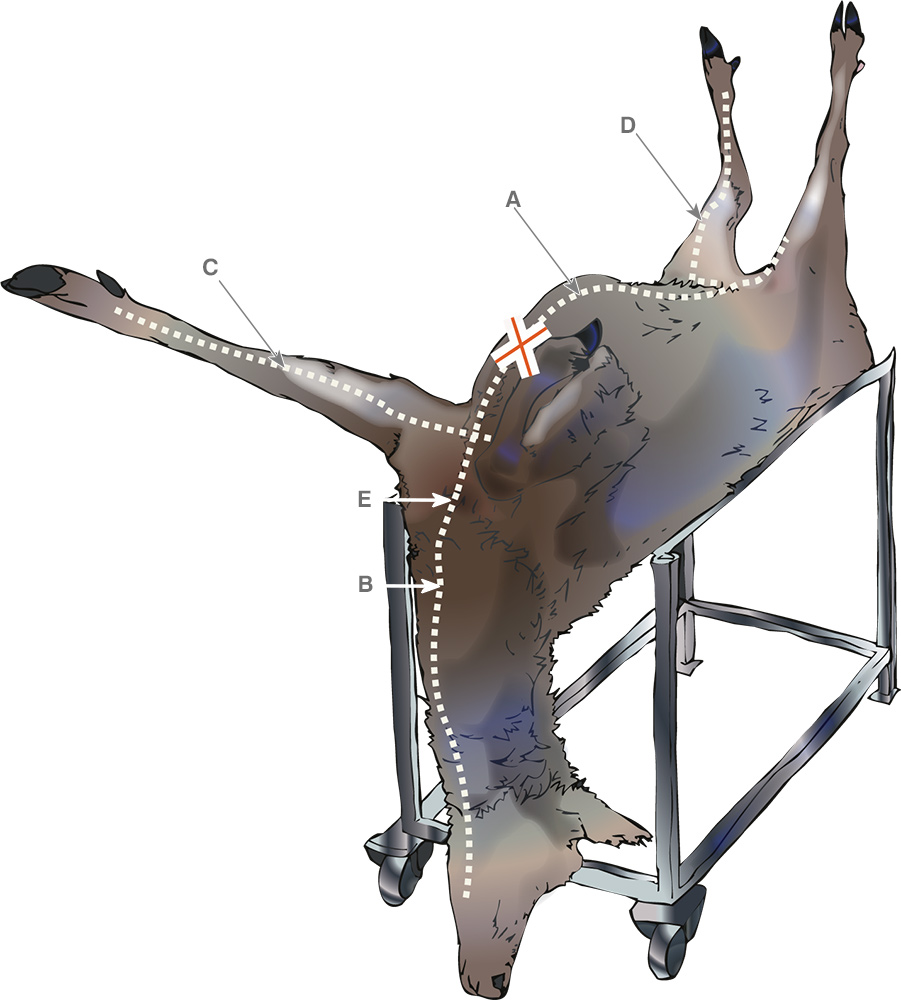
initial cuts (dotted lines) and skinning path (orange arrows, repeat on other side)
Introduction
Skinning converts the in-skin carcass into “game meat”. If the game meat (venison)is intended for anything other than home consumption this changes its legal status as well, see the Supply of Venison guide. The aim of this guide is to describe methods of skinning a deer carcass with the minimum of contamination. It is assumed that initial carcass inspection checks have been carried out and that a full inspection will have been completed by the end of the skinning process, see the Carcass Inspection guide. This guide is linked to the Larder design, Gralloching and Lardering guides.
General
There are many ways of skinning a carcass. Choosing a technique will depend on the size of the carcass, the facilities available and personal choice. All good techniques work with the way the carcass is formed, rather than fight against it. The carcass may be skinned on a bench or hanging up, usually by the hind legs, although hanging by the forelegs, known as “inverted dressing” can be used. A winch can be used to remove the skin, although a degree of preparation is required first.
Ultimately the objective is the same, to produce a hygienic, skin free carcass with no hairs on it, no bloody fingerprints, no unnecessary knife marks and if possible a striped bacon-like appearance on the back. This last feature is somewhat of an aesthetic feature and, although it is a marker of good technique, may be difficult to achieve in some species, depending on carcass condition.
Work area, equipment and hygiene
The work area is often in a deer larder or chiller but in any case should have similar structural standards and be clean and easy to disinfect, see the Larder Design guide. The work area must be washed and disinfected before skinning is carried out. Allow for a clear working space of at least 1 metre around the carcass as it is being skinned.
The equipment required is similar to that recommended for a deer larder and should be cleaned, ready for use.
It may be difficult to use gloves while skinning as they often tear. Clean hands and forearms thoroughly before beginning and wash them frequently in hot water during the process. Wet hands/fists also slide between the skin and the carcass more easily.
Preparation
It is easiest to skin a carcass that is entire and still warm after being culled, completing the gralloch and so on afterwards. Most carcasses however, will already have been gralloched before skinning. For any carcass intended for skinning, and depending on the method to be used, it is worth considering leaving the head and feet on and the chest and pelvis intact to make skinning easier. Skin the carcass as soon as possible after culling unless there is a good reason to leave the skin on.
The carcass can be laid horizontally, belly up,on a larder bench. Alternatively, if it is to be suspended, leave the feet on and put the gambrel/hook through a knife slit above the rear feet, between the lower tendons and the canon bone, not in the hock. This will avoid having to remove the hock skin over the gambrel/hook and leaves the shank of the haunch clean. As another alternative, use stainless steel wire “snares” above the feet. Hang the carcass from a rail.
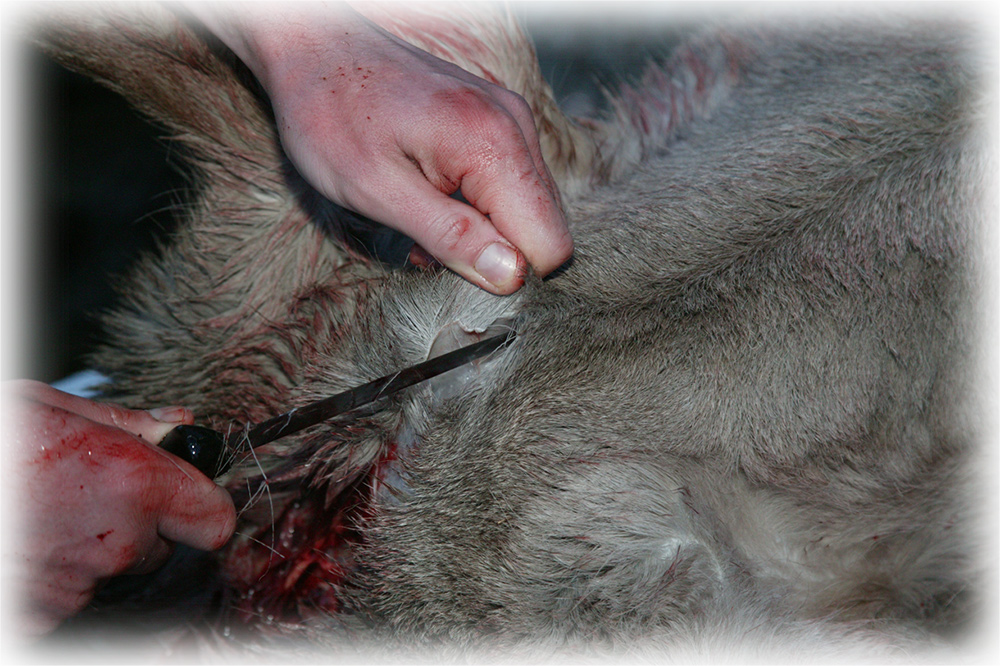
cut through the skin with the knife edge facing outwards
Cuts
In whichever position the carcass is to be skinned, the initial cuts to the skin are similar, although they may vary between practitioners, see dotted lines in Fig 1.
To prevent hairs being cut and leaving loose hairs on the skinned surface, make cuts to the skin from inside/underneath the skin outwards, see Fig. 2. Cut through the skin only, not the flesh beneath it. If the carcass has been gralloched some of the cuts may already have been made.
Cut A: over the sternum from the bleed hole in neck, over the belly and up to the groin. Loosen or remove penis or remove udder.
Cut B: from the bleed hole to the point of the jaw. Care should be taken around the bleed hole area to limit the amount of blood transferred onto the carcass.
Cut C: from Cut A, up the inside of both front legs, onto the canon bone, to just above the hoof.
Cut D: From Cut A, up the inside of both hind legs, onto the canon bone to just above the hoof.
If the carcass is to be skinned in the inverted position an additional cut may need to be made around the top of the neck.
Separating skin and flesh
The key to cleanly removing the skin is to ensure that, from the beginning, no flesh is allowed to come away with the skin. For cradle or hind leg suspended skinning, Fig 1 shows the best place to start (point X), skinning then progresses towards the spine, and along the legs to the feet. Some prefer to use a fist to “tunnel” between the skin and carcass, some prefer to “peel” the skin from the initial cuts, others a combination of both. Try to avoid the use of a knife but if the skin sticks at certain points (over the fan of muscle at the top of the shoulder, in the “armpit” of the forelegs, over the haunch or around the neck) it may be necessary to use a knife to ease the skin away. At all times the skin should separate from the carcass without taking a layer of muscle with it.
Use one hand to hold the skin and to apply tension. Try to minimise the number of times that this grip is changed to avoid producing too much loose hair.
As you work try to prevent the skin from rolling, hair side first, onto the carcass; use gravity to assist you. Leaving the feet on can help with this, skin down to the canon bone joint then separate the foot at the joint, leaving it attached to the skin, weighing it down. Similarly the head can be left on, skinning down to the head then freeing it above the atlas joint at the top of the neck to remove it.
Take particular care in the following areas:
- when starting at point X – be absolutely sure that the skin is free of muscle at this point and that none is picked up as work progresses;
- in the “armpit” of the forelegs – be sure to skin both in front of and behind the web of muscle attaching the foreleg to the brisket before skinning the foreleg out completely;.
- the “fan” of muscle behind the shoulder – this is best freed from the front towards the rear to avoid tearing;
- over the top of the haunches – the skin is tied to the muscle by thin ligaments at this point, break these carefully ensuring that the skin remains free of muscle;
- around the tail – skin to expose the tail bone, separate the tail at a joint close to the carcass, leaving it attached to the skin, then continue to remove the skin on the back carefully ensuring that no muscle will be picked up;
- around the neck – a knife may be required but often pulling on one side and then the other will free the skin. Take care not to slip and bang your knuckles on the floor!
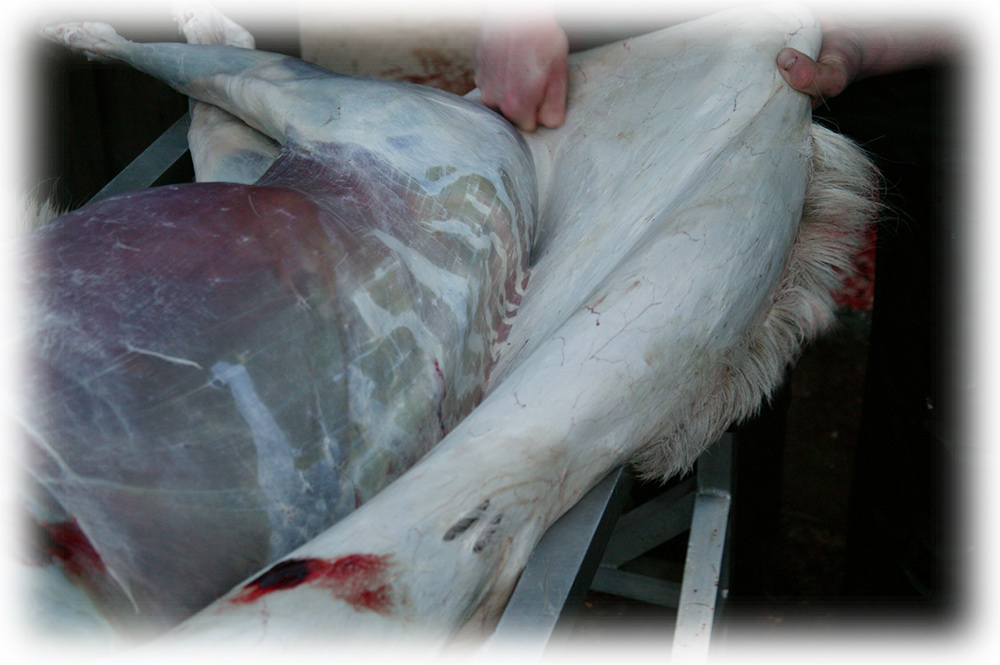
using a fist to separate skin from carcass while tensioning the skin
Towards the end of cradle or rear leg suspended skinning, the skin along the spine and then the neck are the last to be removed. The head can be removed when the axis joint is visible.
If the carcass is skinned in the inverted position (suspended from the forelegs), the neck and shoulder skin are loosened first and the skin pulled downwards towards the tail. If a winch is used the angle of pull can be critical to an efficient skinning process.
If the chest and pelvis are intact, consider splitting them after the skin is removed, this gives better air circulation but exposes more surfaces. Complete any remaining lardering tasks and the carcass inspection. Ideally, if the carcass is warm, leave it hanging to cool slowly and steadily in the first six hours after skinning. This will ensure the full and rapid onset of rigor and will prevent cold shortening of the soft muscles in the carcass. Thereafter carcasses should be stored between 1 and 7°C.