two stages of the lardering process
Introduction
This guide describes the carcass dressing procedures that are ideally carried out in a deer larder, after the gralloch has been performed in the field. The Gralloch guide should be considered essential companion reading. Both are linked to the Carcass Inspection, Carcass Transport, Basic Hygiene, and Larder guides.


Remove the udder
Fig 1. This is best done in the larder but a large udder can prevent access to the rear end and may have to be removed in the field before opening the stomach.
Pinch the skin just in front of the udder and pulling
on it all the time, cut around the udder, removing it
whole, with the skin. Do not take the cut any further
rearwards until back in the larder.
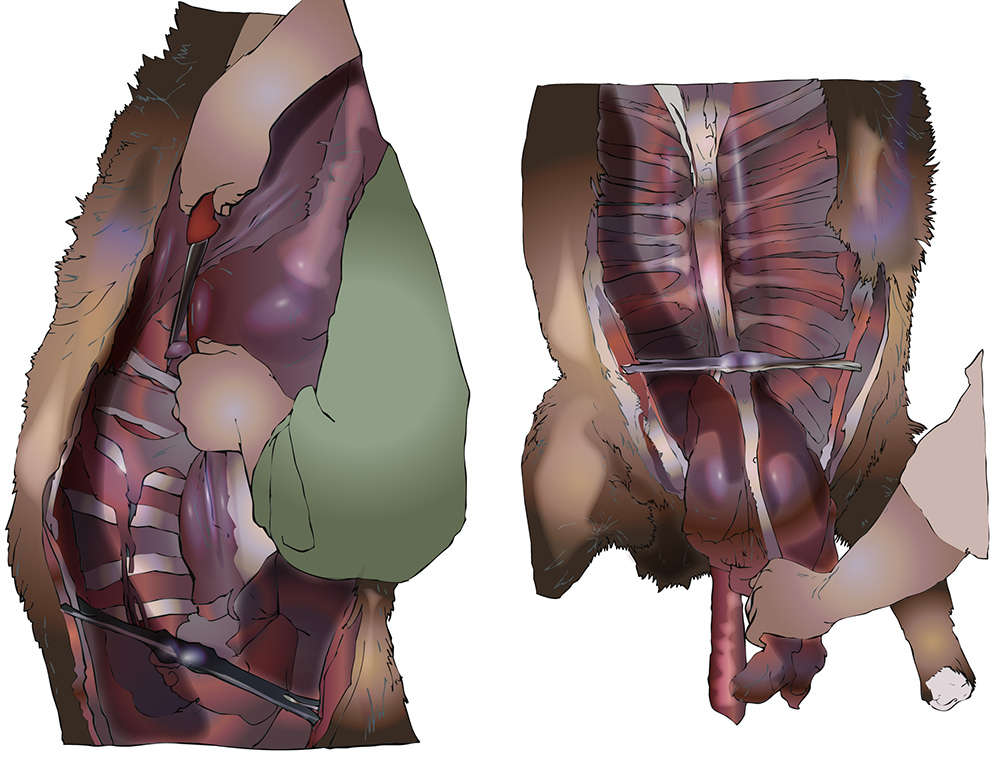
Removing the pizzle (penis)
Fig 2. Pinch the skin just in front of the udder and pulling on it all the time, cut around the udder, removing it whole, with the skin. While pulling on the pizzle sheath and lifting the pizzle up, make a cut either side of the pizzle joining the cuts around the back of the scrotum. Continue the single central cut through the skin almost to the anus, taking care not to damage the haunches. Pull the pizzle free where it runs over the pelvis, cutting the blood vessels. Use the knife to free the pizzle where it turns forward inside the “V” of the pelvis. Leave outside the carcass (draped down the back if the carcass is suspended). It will be removed with the aitch bone, bladder, remainder of the rectum and anus, later.
Split the aitch bone
Figs 3. and 4. Note that some venison processors would prefer that the aitch bone remains intact, check before cutting. While causing the least possible damage to the haunches make two parallel knife cuts down to the aitch bone and complete the cuts with a saw to free a narrow section of bone. Trim out the anus/rectum/pizzle/vagina keeping them intact with the rest of the digestive/urinary/reproductive tract, and lift them out through the cut pelvic bone. Take care not to puncture the bladder.
Remove the pluck
Figs 5. to 8. Make a cut in the skin from the sternum, along the neck, to the head. Following the same line cut through the muscle of the sternum down to the bone. Using a saw, cut centrally through the sternum, avoiding damage to the pluck, be sure to cut through the tough connective tissue around the sticking point. In younger or smaller deer a knife can be used instead of a saw. The knife cut is best made slightly to one side of centre where the ribs join the sternum. Take care that the knife cannot slip and cut the user.
Keeping the liver out of the way, cut around the diaphragm, close to, and all the way around, the ribcage. Cut the aorta/connective tissue against the backbone as you go but avoid damaging the fillets either side of the backbone. Free the heart strings where they connect on the inside of the sternum. Hold the aorta and with a tight grip pull it down and out of the ribcage taking the pluck with it. Cut the windpipe close to the head. Keep the pluck clean to aid inspection and to keep it fit for consumption if required.
Variant – If the pluck must be removed in the field:
Try to angle the carcass head down so that blood flows towards the head, not into the gut cavity. Do not cut the sternum until later, in the larder. Cut the windpipe where it joins the head, free the diaphragm as above, grip the windpipe in front of the heart and pull the pluck out of the chest via the stomach cavity. Do this in a single movement, swinging the pluck away from the carcass to avoid spilling too much blood on the carcass.
To empty any remaining blood, where possible lift the carcass by it’s hind legs so that the blood pours through the bleeding point. Roll heavy carcasses on their side so that blood flows out at the front of the gut cavity without spilling onto the kidney area and hind quarters. Avoid contamination from the environment.
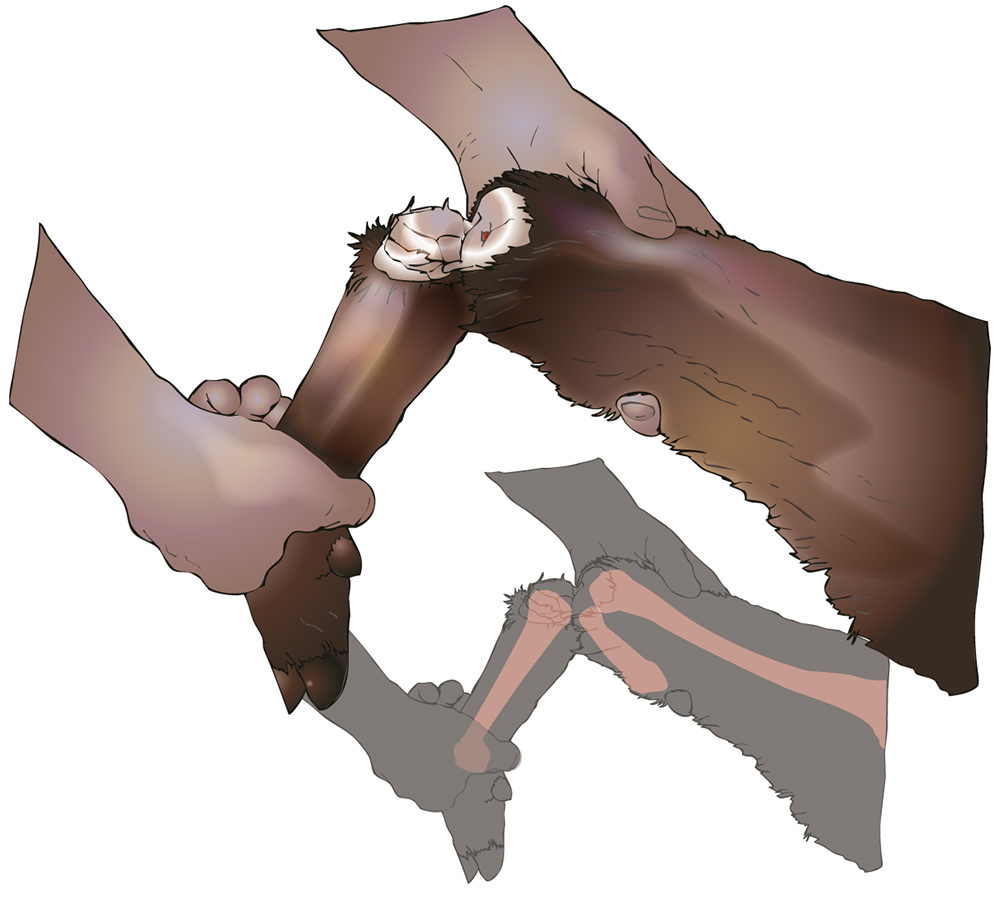
Removing the head
Figs 9. and 10. The head is removed by cutting between the last joint of the neck (atlas joint) and skull. With the carcass is suspended cut across the back of the neck directly in line with the lower back edge of the ears, this will expose the atlas joint. Continue the cut all the way around the neck close to the bone to free the skin and muscle. Pulling on one ear (or antler) insert the point of the knife into the joint and work it round as the joint opens and finally separates.
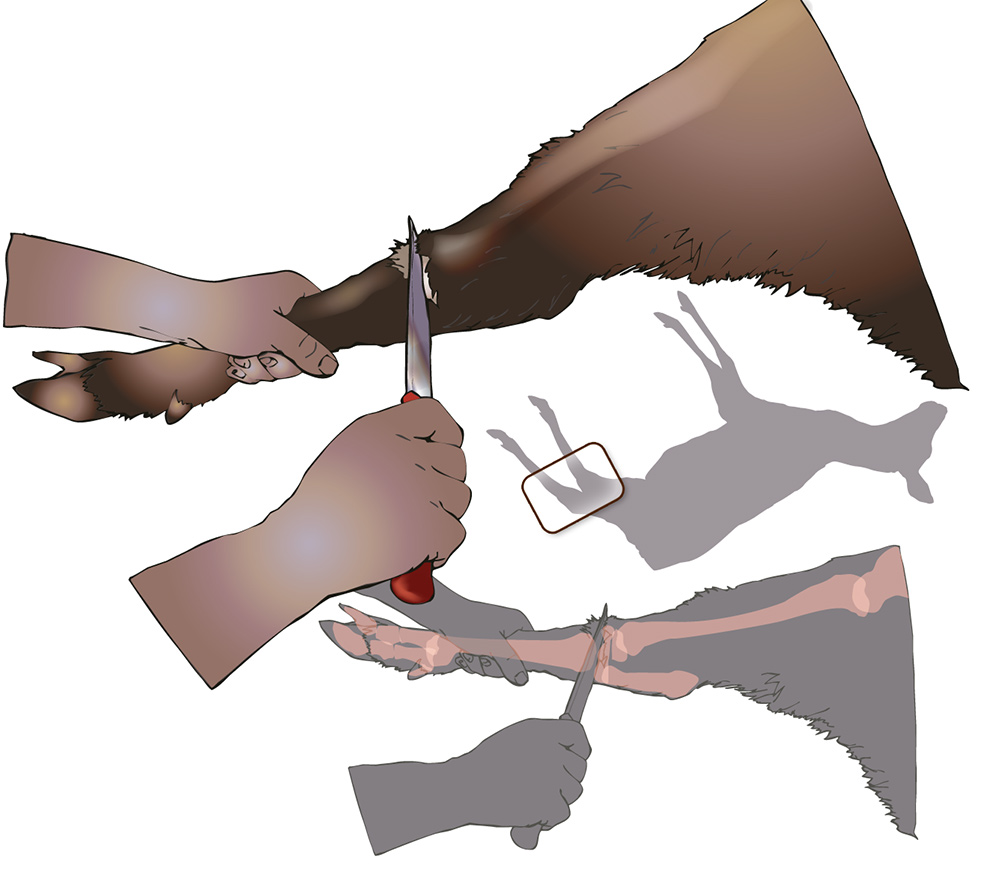
removing the feet. Find lower “bump” on inside of leg and cut around leg
break joint, surfaces should be flat, not rounded
Removing the feet
Figs 11. and 12. Both front and back feet can be removed in the same way. With the leg extended run a thumbnail up the inside of the leg from just below the “knee/elbow” joint. Locate the first ridge of the joint and make a cut from on top of the ridge all the way around the leg keeping the cut perpendicular to the leg. With the leg extended, support the upper leg and bend the lower leg outwards until the joint breaks. If the correct joint (nearest the hoof) has been cut the surfaces of the joint should be flat not rounded.
Suspended carcass
If preferred,the gralloch can be carried out with the animal suspended. This should not be attempted unless adequate support is available and the animal can be lifted or hoisted without risk of injury. Use a clean, stainless steel gambrel, not a stick.
The advantages of suspending the carcass is that it spends less time on the ground and blood from the chest does not flow back over the kidney area and haunches.
The carcass can be suspended either before gralloching begins, or after having carried out preparatory work on the ground (or on a cradle), and just before the gut is dropped out.
Full carcass dressing in the field
Best practice is that as much of the carcass dressing process as possible is carried out in a larder. However it is recognised that in some circumstances a larder may not be available and all of the dressing has to be carried out in the field. Extreme care must be taken to avoid the carcass becoming contaminated. Suspended gralloching and dressing is likely to be cleanest in these circumstances.
Inspection
Carcass inspection is a continuous process taking place before, during and after gralloching and carcass dressing. Be sure that no relevant part is missed during the process. (see Carcass Inspection guide).
Waste disposal
Dispose of waste, both in the field and in the larder, according to the By-product Disposal guide
Removing carcass
Gralloched carcasses should be placed as soon as possible into hygienic transport, see Extraction and Transport guide. If there is a delay, ensure that the carcass will cool, prevent fly strike and access by other animals until collection.
Final processing
In most cases the carcass will be stored in a larder after the gralloch. Depending on what stage the carcass has been dressed to there may be further processing to be done before storage. This may also depend on the requirements of the venison processor. The final stages are:
- Complete carcass dressing. The carcass should be completely empty of organs, with the head and feet removed, and skin on.
- Remove any localised particles of contamination
- Complete inspection
- Weigh and record details
Records
Keeping proper records is strongly recommended. If completing a trained hunter declaration you must take note of all relevant information for completion of the tag. The stage at which you record details will depend entirely on individual situations but if you are dealing with multiple carcasses yourself or in a team, some of the information will need to be recorded at the gralloching stage so that carcass details do not become mixed up, see Record Keeping guide.